Posts

Scourge of the Slavelords XI: Coming for the Inner Council
Image
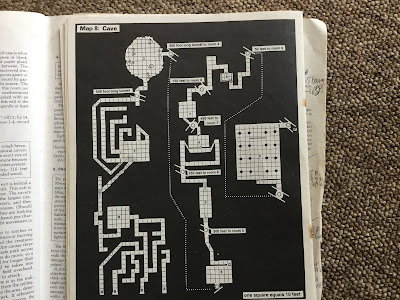
This is the map of the area directly underneath the Slavelords' citadel in the module: According to the plotline of the adventure, the characters are supposed to enter from either of the locations marked B68 or B13b, which are secret tunnels leading from places in the city above. My lot, however, have circumvented this by entering from the myconid village directly underneath location 3 in the bottom right hand corner of the map as you look at it. This holds one of those trick dungeon monsters so beloved of D&D, which is exactly the sort of thing I don't like. This particular 'gotcha' creature is a mimic in the form of a large rug with a chest sitting on it. I repurposed the room so that the mimic is actually a fungal creation that conceals and protects the way down to the mushroom people. They aren't daft... Sir Blanque, Marion and Destiny emerge into a room made of neatly dressed stone from the lair of the myconid king. This presents them with two possible e...

Scourge of the Slavelords X: Spelunking underneath Suderham

Image
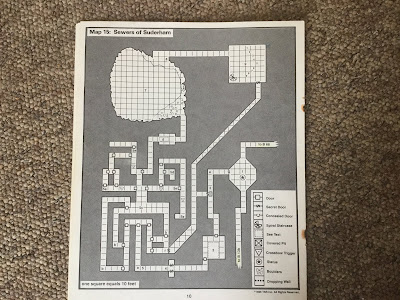
Real life has been extremely busy over the summer, so there has been a bit of a gap in our sessions, plus I still need to write some posts about what we were doing earlier. So here is one we did previously... Marion's hunch about information in the archives of Suderham's mages' guild is a good guess. The partially burned documents that were somehow salvaged from the fortified manor of the hidden volcano island's previous leader turn out to be a useful resource indeed. Sifting through them, Marion pieces some information together about the lava tunnels that riddle the place, or at least enough to place three possible entrances. These are mentioned as the locations to various 'pits' or equivalent into which old Olarek threw anyone who annoyed him, and sometimes just because he felt like it. Marion's reasoning is that these deep tunnels might provide a link to the basement of the slave lords' citadel that could be exploited. The map below is the one fro...

The Sage DM

A new blog has appeared here: https://thesagedm.blogspot.com It's good to see someone else rejoining the fantasy role-playing game world via the blogosphere. I know of Mike via his war-games blog, so I thought I should show some sort of support.

Scourge of the Slave Lords IX: Infiltrating Suderham

Image
I had no intention of railroading the players when I ran this part of the campaign. A map of the deep caverns below the volcanic island on which sits the Slave Lords' city is included in the module, and the idea there is that the players will be captured, thrown into the cave system, and left to rot, albeit with a little bit of help from the Slave Lord who supposedly led them here as a subtle ploy in his machinations to take over the organisation's council completely. This wouldn't sit well with players like mine, especially given how I have integrated it into my Stormbringer  campaign, but that is not to say the caverns would not come in handy... Campaign narrative Dramatis Personae: Sir Blanque (Filkarian noble of mer-people extraction)                                 Marion (Daughter of the Nihrain; likes daggers and carries the Runestaff)                ...

Scourge of the Slave Lords VIII: Finding Suderham

Image
Campaign narrative The three friends - Marion, Sir Blanque and Destiny - travel onwards in a SW direction towards the mountains between Changshai and Okara. According to information suppled by the renegade Dai-Oni Blackthorn, the hidden city of Suderham lies in a volcanic bowl in the midst of the mountains, about 150 miles northwards from the coastal point where the Sea of Circles meets the Dawn Ocean. It all sounds very nice, and is indeed extremely pretty, but it is a bit of a slog through forested hills rising towards the mountains in the distance. Once there, they will be looking for a hidden entrance leading to a dangerous cave system that winds it way through the mountains to an exit just outside the slums near Suderham itself. The advantage to this route is that it hopefully might not attract the slavers' attentions - either that, or the group will somehow have to try to find a way through the only fortified pass across the mountains without giving themselves away. About ...

Scourge of the Slave Lords VII: Plots and counterplots

Image
Campaign Narrative The conversation underneath the slavers' stockade takes an interesting turn. After agreeing to betray his erstwhile masters, Blackthorn the Dai-Oni (whatever that is) gleefully gives the players lots of information. It turns out that not only is he well aware of the machinations of the Dharzi sorceress Markessa, but also that there is a further split developing within the ranks of the Dharzi themselves. "House Eilservs is the Dharzi noble clan that has been entrusted by Lolth the Spider Queen to infiltrate the Lands of the East," he continues. "However, the matriarch of that House, Lady Eclavdra, has ordered her agents in the Slavers' organisation to sabotage it, thus subverting the deal between Lolth and Stalman Klim, the High Priest of Xiombarg. He is the man who summoned me to this plane, and for that I owe him a debt of treachery. I should have been passing on this information to him, but sometimes the juiciest part of betrayal is the subt...

Scourge of the Slave Lords VI: Beneath the Stockade

Image
Campaign Narrative Now that they have some allies to guard their rear, the adventurous three make their way carefully deeper into the basement level beneath the slavers' stockade. They emerge from the area of the complex belonging to the Dharzi Markessa into a long corridor. To their right, it leads in the direction of the concealed entrance by which they sneaked into the complex, and to the left there is clearly a complicated series of rooms, all artificially constructed and properly faced with dressed stone. They decide to go further to their left, mainly because the way to their right seems to become rough-hewn rather than artificial, and also because they can hear the barking of some unusually large wolfhounds of some sort. A zoomed-in map of the location of the little band. They are now at the corridor point marked as 30 on the map. The barking noises are coming from area 19; the corridor outside there becomes more of a tunnel as it heads off the bottom edge of the map t...