Scourge of the Slave Lords VIII: Finding Suderham
Campaign narrative
The three friends - Marion, Sir Blanque and Destiny - travel onwards in a SW direction towards the mountains between Changshai and Okara. According to information suppled by the renegade Dai-Oni Blackthorn, the hidden city of Suderham lies in a volcanic bowl in the midst of the mountains, about 150 miles northwards from the coastal point where the Sea of Circles meets the Dawn Ocean. It all sounds very nice, and is indeed extremely pretty, but it is a bit of a slog through forested hills rising towards the mountains in the distance. Once there, they will be looking for a hidden entrance leading to a dangerous cave system that winds it way through the mountains to an exit just outside the slums near Suderham itself. The advantage to this route is that it hopefully might not attract the slavers' attentions - either that, or the group will somehow have to try to find a way through the only fortified pass across the mountains without giving themselves away.
About a week into their trip, which should take ten days or thereabouts, the trees begin to thin as what passes for a trail climbs higher. Sir Blanque spots a strange statue between the trees off to the right of the trail in some hills that are rockier than usual, so the group goes to investigate. It turns out to be an enormous bird, seemingly made of stone. On approach, however, its eyes open and regard the adventurers with calm intelligence. It then addresses Sir Blanque directly: "I do believe you are a servant of Law, as am I. If you will accept me, I pledge myself to your service." It shakes off the dust of ages, revealing a beautiful metallic body - this is one of the fabled Virtues of Law, this time specialising in travel - the Lawful equivalent of a Demon of Transport. It flies off into the sky and circles the adventurers are they proceed. It's large enough for Sir Blanque to ride it, but it would struggle to take any more passengers. Its utility is rather limited in the mountains, but at least it can scout for the group.
Eventually they reach the rough location of the secret cavern entrance, and get ready to bed down for the night before searching properly for it the following day. During the night, their camp is attacked by a large bear-like creature with the head of an enormous owl - a rapacious animal that they guess is the result of Dharzi magics. Between them, they manage to subdue the thing; since Sir Blanque reckons it's just hungry, he wants it to be left alive rather than killed for trying to eat.
The next day's searching reveals several well-camouflaged entrances leading into the mountainside. All of these have tunnels that eventually lead to an artificially faced square room that contains large chunks of meat hanging on frames, with a single exit leading further into the mountains.
The first real obstacle comes in the form a false doorway that is actually the lever to open a sloping pit trap beneath the adventurers' feet (no.1 on the map). However, a critical See roll by Marion makes them realise that the floor is just a bit too uneven, with a slight lip where none would normally be. The characters prise it open, discovering the slide downwards, which is liberally coated with crystals of some kind to make it quite slippery - anyone falling in there would be on a swift one-way trip, presumably with something waiting for them at the other side. They check out the doorway anyway, and once they realise that it's a dead-end, they gingerly lower themselves into the sloping passage, making use of Destiny's earth elementals to make sure they can't slip. This allows them to proceed relatively noiselessly.
The group's caution turns out to be wise as they hear the conversations of around a dozen guards in a room at the end of the slide. Destiny fireblasts them and a bit of quick slaughter sees a couple of the men captured; the Melnibonean also uses her air elemental to keep any noises from travelling further into the cave system. The prisoners (and their dead friends) are members of Xiombarg's Chaos pack, which further adds to the party's knowledge that their main enemy, the usurper Stalman Klim, is a Priest of that Chaos deity. The two survivors, however, are unwilling to die, and are overawed by their enemies' sorcerous might. They explain that the next section of tunnels leads to a large cave that is inhabited by malevolent things that drop from the ceiling to kill and eat whatever they can; that is what the strips of meat are for - throw them in first and you can walk past safely. Destiny wonders how the beast men can walk up the slippery slope to the meat larder, but this question is answered when it is pointed out that they have camel-like feet; they also have the heads of hyaenas. These two know they are lucky to be alive, and suggest that they can help the players by introducing them to their guard dogs and their handlers who are stationed a long way past the weird cavern. If the characters let them all go, they promise to leave by the cavern entrances and never look back. "If we fail in our guard duties, the slavers will kill us anyway."
This plan of action is mutually agreeable, and the small party continues on its way. The hyaena men guide them to a room they themselves have never entered, and then promise to leave. "The next chamber is magical, and terrifies us." This takes the party to the long room marked 5 on the map.
Steps lead down to a long pool of bubbling white gooey stuff; halfway across, a shimmering blue curtain hangs right across the width of the entire place, hovering just above the goo. The adventurers can make out another set of stairs leading upwards out of the room at the far side. Sir Blanque recognises the smell of ozone - "It's some sort of electrical trap," he says. With that, the group uses water elementals to push the gloop out of their way and simply walk across the bottom of the pool. Marion makes a critical See roll, and realises that there is a still point at arms' length in the white stuff just to her right, so she reaches in and grabs what turns out to be an invisible magical sword - exactly the sort of thing that appeals to her murderous instincts.
The next chamber is entirely bare apart from a single rope hanging from the middle of the ceiling; there are no exits. The floor does not seem to be quite flush with the walls, so the players suspect that the entire place is a trap. Destiny uses her air elemental to move her across to the rope without touching the floor, and as soon as she grabs the rope a secret door opens in the far wall. At the same time, the whole floor folds back in on itself in two halves, revealing an enormous pool of some nasty looking liquid - probably acid, the group decides. Marion uses her magical grappling hook to create a way across and goes first, hand over hand, landing easily on the far side. Sir Blanque is next and then it is Destiny's turn as the others wedge open the door for her - presumably it will close once the rope is released. There is a heart-stopping moment as Destiny fumbles on the way across, but is saved by a water elemental she placed strategically, just in case - and just as well.
This takes them to room 7 on the map, which contains this:

Some sort of gigantic demonic blob thing with tentacles, stone armour and magical abilities. Oh, plus a massive gob. They hurt it a lot and it slinks downwards into whatever horrible caverns lie further below; this reveals a doorway that was hidden behind it, so the three friends go that way.
The next doorway leads into another trap room, although this time it is the doorway out that is the trap itself. Basically, the entire room is covered in knotty wood, including the two doors, but the wood is only a veneer that covers the actual stone walls, floor and ceiling. There is another behind the door leading out - the wooden door is false, and various spikes are primed to stab out at anyone who tries to open it. The characters don't know this, but since they don't like the look of the thing, they use an earth elemental to open it, and it seems to enjoy being poked a bit.
The final, large room marked 9 on the map is the final encounter. Here the characters overcome a series of illusions, along with the minor slavelord who powers them and his bodyguards, who turn out to be more of the hyaena men from the Chaos pack. They are killed while the weedy little man pleads for his life. Sir Blanque lets him live on condition that he does a runner just like the creatures they met earlier, and he does so - failure in the slave lords' organisation means death, so he heads back into the tunnels to take the long way out to relative safety. The characters then emerge near the Suderham slums, with dawn approaching.
Umpire's comments
It is still good fun watching the players encounter old D&D monsters for the first time - including an owlbear. It's not clear from the map, but the idea is that the caverns stretch right through the mountains - they've just been printed onto a single page to save paper, presumably. Anyway, this means that this part of the campaign is a bit of a railroad as they encounter a series of set elements, but each of them is different enough to keep things interesting. The hyaena men are Gnolls in the original, but I just made them members of Xiombarg's favourite Chaos pack. Nice and easy to translate to Stormbringer.
The three friends - Marion, Sir Blanque and Destiny - travel onwards in a SW direction towards the mountains between Changshai and Okara. According to information suppled by the renegade Dai-Oni Blackthorn, the hidden city of Suderham lies in a volcanic bowl in the midst of the mountains, about 150 miles northwards from the coastal point where the Sea of Circles meets the Dawn Ocean. It all sounds very nice, and is indeed extremely pretty, but it is a bit of a slog through forested hills rising towards the mountains in the distance. Once there, they will be looking for a hidden entrance leading to a dangerous cave system that winds it way through the mountains to an exit just outside the slums near Suderham itself. The advantage to this route is that it hopefully might not attract the slavers' attentions - either that, or the group will somehow have to try to find a way through the only fortified pass across the mountains without giving themselves away.
About a week into their trip, which should take ten days or thereabouts, the trees begin to thin as what passes for a trail climbs higher. Sir Blanque spots a strange statue between the trees off to the right of the trail in some hills that are rockier than usual, so the group goes to investigate. It turns out to be an enormous bird, seemingly made of stone. On approach, however, its eyes open and regard the adventurers with calm intelligence. It then addresses Sir Blanque directly: "I do believe you are a servant of Law, as am I. If you will accept me, I pledge myself to your service." It shakes off the dust of ages, revealing a beautiful metallic body - this is one of the fabled Virtues of Law, this time specialising in travel - the Lawful equivalent of a Demon of Transport. It flies off into the sky and circles the adventurers are they proceed. It's large enough for Sir Blanque to ride it, but it would struggle to take any more passengers. Its utility is rather limited in the mountains, but at least it can scout for the group.
Eventually they reach the rough location of the secret cavern entrance, and get ready to bed down for the night before searching properly for it the following day. During the night, their camp is attacked by a large bear-like creature with the head of an enormous owl - a rapacious animal that they guess is the result of Dharzi magics. Between them, they manage to subdue the thing; since Sir Blanque reckons it's just hungry, he wants it to be left alive rather than killed for trying to eat.
The next day's searching reveals several well-camouflaged entrances leading into the mountainside. All of these have tunnels that eventually lead to an artificially faced square room that contains large chunks of meat hanging on frames, with a single exit leading further into the mountains.

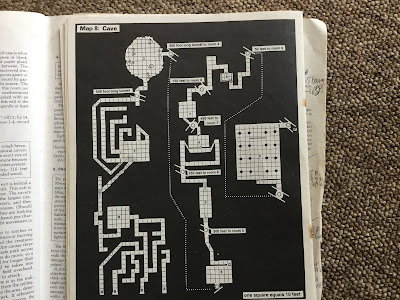
Map of the cavern route; the players begin at the bottom left of the complex as you look at it.
The first real obstacle comes in the form a false doorway that is actually the lever to open a sloping pit trap beneath the adventurers' feet (no.1 on the map). However, a critical See roll by Marion makes them realise that the floor is just a bit too uneven, with a slight lip where none would normally be. The characters prise it open, discovering the slide downwards, which is liberally coated with crystals of some kind to make it quite slippery - anyone falling in there would be on a swift one-way trip, presumably with something waiting for them at the other side. They check out the doorway anyway, and once they realise that it's a dead-end, they gingerly lower themselves into the sloping passage, making use of Destiny's earth elementals to make sure they can't slip. This allows them to proceed relatively noiselessly.
The group's caution turns out to be wise as they hear the conversations of around a dozen guards in a room at the end of the slide. Destiny fireblasts them and a bit of quick slaughter sees a couple of the men captured; the Melnibonean also uses her air elemental to keep any noises from travelling further into the cave system. The prisoners (and their dead friends) are members of Xiombarg's Chaos pack, which further adds to the party's knowledge that their main enemy, the usurper Stalman Klim, is a Priest of that Chaos deity. The two survivors, however, are unwilling to die, and are overawed by their enemies' sorcerous might. They explain that the next section of tunnels leads to a large cave that is inhabited by malevolent things that drop from the ceiling to kill and eat whatever they can; that is what the strips of meat are for - throw them in first and you can walk past safely. Destiny wonders how the beast men can walk up the slippery slope to the meat larder, but this question is answered when it is pointed out that they have camel-like feet; they also have the heads of hyaenas. These two know they are lucky to be alive, and suggest that they can help the players by introducing them to their guard dogs and their handlers who are stationed a long way past the weird cavern. If the characters let them all go, they promise to leave by the cavern entrances and never look back. "If we fail in our guard duties, the slavers will kill us anyway."
This plan of action is mutually agreeable, and the small party continues on its way. The hyaena men guide them to a room they themselves have never entered, and then promise to leave. "The next chamber is magical, and terrifies us." This takes the party to the long room marked 5 on the map.
Steps lead down to a long pool of bubbling white gooey stuff; halfway across, a shimmering blue curtain hangs right across the width of the entire place, hovering just above the goo. The adventurers can make out another set of stairs leading upwards out of the room at the far side. Sir Blanque recognises the smell of ozone - "It's some sort of electrical trap," he says. With that, the group uses water elementals to push the gloop out of their way and simply walk across the bottom of the pool. Marion makes a critical See roll, and realises that there is a still point at arms' length in the white stuff just to her right, so she reaches in and grabs what turns out to be an invisible magical sword - exactly the sort of thing that appeals to her murderous instincts.
The next chamber is entirely bare apart from a single rope hanging from the middle of the ceiling; there are no exits. The floor does not seem to be quite flush with the walls, so the players suspect that the entire place is a trap. Destiny uses her air elemental to move her across to the rope without touching the floor, and as soon as she grabs the rope a secret door opens in the far wall. At the same time, the whole floor folds back in on itself in two halves, revealing an enormous pool of some nasty looking liquid - probably acid, the group decides. Marion uses her magical grappling hook to create a way across and goes first, hand over hand, landing easily on the far side. Sir Blanque is next and then it is Destiny's turn as the others wedge open the door for her - presumably it will close once the rope is released. There is a heart-stopping moment as Destiny fumbles on the way across, but is saved by a water elemental she placed strategically, just in case - and just as well.
This takes them to room 7 on the map, which contains this:

Some sort of gigantic demonic blob thing with tentacles, stone armour and magical abilities. Oh, plus a massive gob. They hurt it a lot and it slinks downwards into whatever horrible caverns lie further below; this reveals a doorway that was hidden behind it, so the three friends go that way.
The next doorway leads into another trap room, although this time it is the doorway out that is the trap itself. Basically, the entire room is covered in knotty wood, including the two doors, but the wood is only a veneer that covers the actual stone walls, floor and ceiling. There is another behind the door leading out - the wooden door is false, and various spikes are primed to stab out at anyone who tries to open it. The characters don't know this, but since they don't like the look of the thing, they use an earth elemental to open it, and it seems to enjoy being poked a bit.
The final, large room marked 9 on the map is the final encounter. Here the characters overcome a series of illusions, along with the minor slavelord who powers them and his bodyguards, who turn out to be more of the hyaena men from the Chaos pack. They are killed while the weedy little man pleads for his life. Sir Blanque lets him live on condition that he does a runner just like the creatures they met earlier, and he does so - failure in the slave lords' organisation means death, so he heads back into the tunnels to take the long way out to relative safety. The characters then emerge near the Suderham slums, with dawn approaching.
Umpire's comments
It is still good fun watching the players encounter old D&D monsters for the first time - including an owlbear. It's not clear from the map, but the idea is that the caverns stretch right through the mountains - they've just been printed onto a single page to save paper, presumably. Anyway, this means that this part of the campaign is a bit of a railroad as they encounter a series of set elements, but each of them is different enough to keep things interesting. The hyaena men are Gnolls in the original, but I just made them members of Xiombarg's favourite Chaos pack. Nice and easy to translate to Stormbringer.

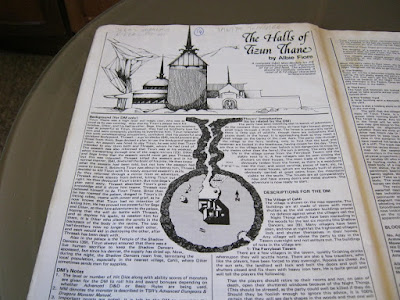
Well they're certainly getting the hang of this and it's great fun watching them working their way through these period scenarios! The photos of the original publications is a nice touch!
ReplyDeleteBest Iain