Castle Amber III: The Chapel and the Crypts
The four adventurers pass on through the great double doors at the northern end of the strange internal garden at the centre of the Chateau d'Ambreville. They know that what lies beyond is the chapel, and according to the seeress who gave them the instructions for the ritual to return Stephen Amber, located somewhere beneath the chapel is a triple-locked silver gate. They already have two of the large silver keys, and are looking for a third; this should enable them to pass through to the province of Averoigne on an alternative world.
They find themselves immediately in an enormous cross-shaped main building with several doors leading to different parts of the cross, as well as a couple of flights of stairs leading up to an organ loft. Dominating the room are rows of statues of the Amber family, all looking slightly deranged. There is a high altar at the far end covered in elaborate yellow drapes.
Shrugging, the group goes straight for the altar. Shifting the drapes reveals that the altar is a table, as opposed to being solid, and underneath a trap door is set into the floor. Opening that shows a grand flight of stairs going downwards.
The stairs lead to a huge, 30' wide hallway that stretches to an ornate set of double doors. These in turn lead into a grand hall outfitted as a full experimental laboratory - it must be at least 100' on a side. As the characters enter, a counterweight starts to pull the heavy entrance doors closed behind them, and little flaps above head height start to open all around the room; Marion catches a glimpse of some sort of black dust in one of them. Sir Blanque's lightning reflexes save the situation, though, as he spins back to stop the doors closing. This stops the flaps opening and the dust (or whatever it is is) coming into the room. The players use some lab benches to wedge the doors so that they can continue on their way. From Marion's description of the dust, Destiny reckons they have just avoided being dosed with Black Lotus...
Two doors lead out from the lab, one on each of the side walls. The door to the left is in the middle of the wall, while that to the right is in the corner nearest the group; they take that one. It takes them into a rather confusing area; it looks like a very large chamber with several internal sub-rooms, each entirely separate from the others. There are seven of these.
The first room they try contains a large circular pool of some sort of liquid, in the middle of which a glass sphere is bobbing up and down; it contains the third key. Not trusting the liquid, Destiny uses a water elemental to pull the glass sphere to the edge of the pool. Now they have all the keys they need.
The second room contains a magical summoning circle of a kind unfamiliar to characters from the world of the Young Kingdoms. This is what it contains:

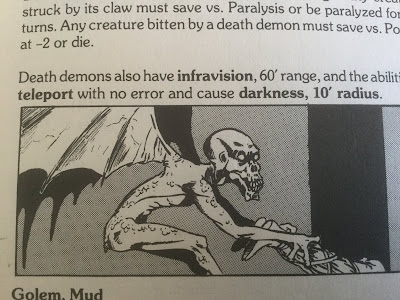
Minus the dead adventurer's legs, this gives a pretty good indication of what the demon inside the five-pointed star looks like.
The creature pleads prettily to be let loose, but the characters are having none of it; Destiny reckons it's rather powerful and nasty, so they decide to leave it well alone. The next room is an empty old store, with a copy of the scroll they already have lying on top of one of the dusty shelves, albeit without the yellow seeress' notations. In the next room, the adventurers dispatch a very large slimy worm thing. Next up is a room contains what can only be described as fire hounds of enormous size; between Marion and Destiny the group makes friends with the creatures and then moves on...
...to find the silver gate. It is protected by a gigantic amber lion construct, which is destroyed quite quickly. As its operating mechanism deteriorates, it shatters, revealing another clue scroll. Marion gathers up the amber from which the thing was constructed - worth a pretty penny, it would seem.
Now to go through the gate to Averoigne itself.

Comments
Post a Comment