Desert of Desolation XII
Sir Blanque - swordsman and handsome, dashing noble half mer-person
Marion - stabby stabby dagger specialist; Nihrain who currently carries the Runestaff
Destiny - Menastrai sorceress covertly raised on Melnibone
Bomilcar - Weeping Waste nomad from a chieftain's family
Campaign Narrative
Now that the underlying to the Sheikh of the White Pam Oasis has been detected and removed, thoughts move on to what needs doing next. The characters have obtained three of five Star Gems they need in their quest to find Martek's sphere of power, and they know from previous oracular encounters that the fourth is located in a place called the Crypt of Badr Al-Mosak, which lies a few days' journey roughly eastwards from the Oasis.
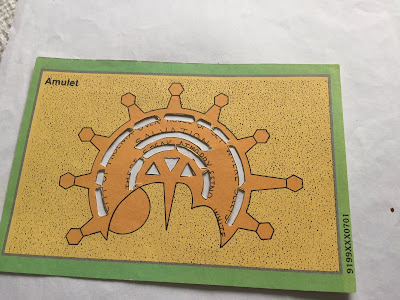
However, still missing from the nomads' camp is the betrothed of the Sheikh's son and heir, Princess Shadalah. Tradition states that the palm of the chosen betrothed of the tribal leader is marked with the favour of Ainu, the One God of the desert peoples, and indeed Shadalah has the appropriate palm prints. They are supposed to match up with a medallion carried by the tribal leaders:


Marion - stabby stabby dagger specialist; Nihrain who currently carries the Runestaff
Destiny - Menastrai sorceress covertly raised on Melnibone
Bomilcar - Weeping Waste nomad from a chieftain's family
Campaign Narrative
Now that the underlying to the Sheikh of the White Pam Oasis has been detected and removed, thoughts move on to what needs doing next. The characters have obtained three of five Star Gems they need in their quest to find Martek's sphere of power, and they know from previous oracular encounters that the fourth is located in a place called the Crypt of Badr Al-Mosak, which lies a few days' journey roughly eastwards from the Oasis.
However, still missing from the nomads' camp is the betrothed of the Sheikh's son and heir, Princess Shadalah. Tradition states that the palm of the chosen betrothed of the tribal leader is marked with the favour of Ainu, the One God of the desert peoples, and indeed Shadalah has the appropriate palm prints. They are supposed to match up with a medallion carried by the tribal leaders:

This is quite a clever little handout that comes with the module. The amulet is supposed to be laid over the hand of the princess to reveal a hidden message handed down by Martek. It's in English so that the players can read it, but obviously the language is supposed to be something else...
.
The medallion is inscribed with the top half of characters in a language the locals don't recognise. However, Destiny does: it's in High Melnibonean. Apparently there is quite a lot of tribal lore associated with this item, one snippet being that the inscriptions on the amulet and the betrothed will protect them from a great evil. Also, some further questioning of the slowly expiring high priest of Set staked to the desert sands outside reveals that his cult had a deal with the Efreet Lord Khalitharius who is causing all the trouble, but the Fire Lord betrayed the cult and kidnapped the princess. According to the high priest, Khalitharius has taken over a place called the Crypt of Badr Al-Mosak and taken the princess there; for some reason, the being seemed concerned about Shadalah's existence, but was unable to harm her. So it looks as though the players need to go to the Crypt to rescue the princess, match up the clues on the amulet, and also gain Star Gem number four. And it just so happens that Kahlitharius has taken up residence in exactly the place the party would be heading for anyway - another 'coincidence' of the kind that has been becoming increasingly frequent in their Balance-filled lives. Especially ever since they acquired the Runestaff. The Sheikh's heir Hassan wants to go with them, but the players feel he is too emotionally involved to be reliable; besides, this is going to be dangerous, and he is not exactly indispensable. They make him feel better by reminding him that remnants of the murderous cult probably still need rooting out at the Oasis.
They fly more or less eastwards for a few days in their special reed boats, eventually arriving at their goal. There is a wide sunken area in the sand, an ancient amphitheatre that has a pharaoh's statue at the centre. It radiates Chaos at its most evil, and Bomilcar finds himself unable to approach [He has the lowest Power in the group]. Destiny uses earth elementals to shift the statue and, as expected, a shaft goes deep into the ground:

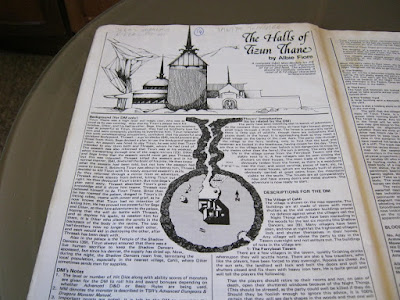
The map of the main level of the Crypt also has a handy lateral view to the right as you look at it. The entryway leads to the crosshatched circular area at the top of the map which has a round walkway with four alcoves leading off in the cardinal directions.
Marion attaches her magically enhanced grapnel to the base of the statue and is carefully lowered into the depths, in true Mission Impossible style. Once she has descended below the lip of the entrance to the shaft, she invokes her Shadow abilities. It is just as well she does so, because at the 80' level, she spies a very faint irregularity in the wall, a line in the mortar that seems just a little bit different from the rest. She cautiously extends an old leather strap past there and waits. Sure enough, a few seconds later, an exceptionally sharp scything blade sweeps out and across the whole well; it has been set to activate shortly after someone passes it on a rope. Slicing that would lead to a catastrophic fall into the depths...
Marion moves to the wall from where the trap emerged, and with her demon dagger she disables the sprockets of the reset mechanism, which is set into the wall in a little interior slot of its own. She then lowers herself to the circular walkway and investigates the alcoves while Sir Blanque and Destiny rappel down to join her. The shaft disappears beyond and into the blackness beneath.
Each alcove turns out to be a short passageway of around 20' leading to a statue. The one to the south, marked 3a on the map, is another of the ubiquitous pharaoh statues. This one is liberally studded with 2' long blades, all pointing straight towards the shaft in the centre of the area. The one to the west (3b) is a statue of a fish-headed woman with six arms, each of which holds a gleaming scimitar. 3c to the north is an efreet statue, with its mouth wide open. To the east, 3d is a statue with four arms; this one holds two drawn composite bows. All of the statues are facing down their respective statues straight towards the central well.
Marion moves to investigate each of them in turn. Methodically, Sir Blanque and Destiny wait to either side of the relative entrances to flank any that might animate, while Marion carefully moves towards them. She starts with the westwards passage, intending to move anti-clockwise round all four. In each of the first three she finds a pressure plate that is obviously designed to set off whatever the trap is on each statue, but rather than activate any of them she decides to check them all. The last one, the most dangerous looking one with all the spiked blades (3a leading south) turns out to be the only one that is not trapped, so the group goes that way. They don't even bother to set off the other ones.
The inevitable secret door behind that statue leads into what is clearly a square antechamber (room 4b on the map). It contains yet another statue facing them, and also has two doors leading eastwards and westwards on each side. They take the door to their left, and this takes them into a smaller square chamber (room 6). This one is similarly empty, although the walls are covered in lovely marble tiling. Marion thinks this is exactly the sort of place where a secret door or panel can easily be concealed, and sure enough she finds one directly opposite their entry point.
The passage now ahead of them turn almost immediately to their right. They follow, entering an extremely long corridor heading directly south; it ends in a doorway that they reckon must be concealed from whatever is on the other side. their guess is correct, and they now find themselves in the octagonal room marked 9 to the right of the map as you look at it [It's identical to another one on the other side of the map]. There is a 30' high monolith made of similar black stone to the statue in the amphitheatre above, but this one doesn't give off any negative waves. Again, there are alcoves with short passageways. The one to their left leads to another shaft, while that to their right contains a doorway. They go to the shaft:

A permanent teleport everfalling trap.
This shaft is different from the one they found at the entrance to the Crypt. It goes upwards and downwards to darkness, although there seem to be little motes dancing in it. Part of the way up on the same wall where they are standing is a passageway to an upper level; they can see some shifting lights playing out from within, which is how they see it. As they watch, astonished, a mummified corpse falls from where the ceiling should be, vanishing into the depths below. It then reappears at the top of the shaft and falls again. It makes malevolent but useless movements, motioning ti grab them as it falls. This continues, and the players realise the nature of the trap. Sir Blanque uses the fire elemental in his Sternbrow sword to set the mummy alight, and they watch it burn as it repeatedly flies past them inits everfalling loop.. Eventually all that is left is repeatedly falling dust particles. [There were supposed to be tree mummies, but that seemed a bit silly...]
As usual, Marion leads the climb, and the group find themselves in an upper level to the complex:

The players are in the easternmost of the three rooms marked 1 on the map.
A flight of stairs leads up to the source of the sparkling lights they could see from the everfall trap. So many beams of light are criss-crossing the room in front of them that the glare makes it impossible to make out its dimensions correctly as they glance off walls covered in a crystalline reflective substance. Destiny invokes a darkness rune, and the reflections vanish. The players can now discern the four main beams that criss-cross what is now obviously an octagonal room 30' wide. The beams are set at heights of 2', 3', 4' and 6', so the characters crawl under them all and out the far side. They have no idea what a beam would do if it hits, but they don't want to find out...
Another flight of stairs leads up to another octagonal room, which is much larger (area 2 on the map). Here Khalitharius is waiting for them. He is holding a human-sized bottle that is reminiscent of a large amphora, and grins at them. However, Destiny steps forward and brandishes the amulet given to them by Hassan earlier. The fire lord growls, turns to smoke and vanishes. The stopper on the bottle is removed, and another stream of smoke resolves itself into the form of the princess. She takes them into the next room and gives them the next Star Gem, explaining that the presence of herself and the amulet together was too painful for the Fire Lord to bear. It seems that Martek had planned this all along as a way of protecting the tribe at the Oasis from Khalitharius...

Comments
Post a Comment