Desert of Desolation XIII
Sir Blanque - swordsman and handsome, dashing noble half mer-person
Marion - stabby stabby dagger specialist; Nihrain who currently carries the Runestaff
Destiny - Menastrai sorceress covertly raised on Melnibone
Bomilcar - Weeping Waste nomad from a chieftain's family
Campaign Narrative
The four characters have just returned to the Oasis of the White Palm after rescuing Princess Shadalah from the powerful Fire Lord Khalitharius. They accomplished this with some aplomb, hardly coming across anything until the final encounter with the giant Efreet, who fled rather than confront them due to an enchanted amulet the group was carrying. They didn't know this at the time, but the route they took through the Crypt of Bard Al-Mosak to find the princess allowed them to avoid several powerful undead under his command; at one point there were five wights waiting for them in the same room. Now back at the Oasis, they lay the amulet over the markings on the princess' palm:
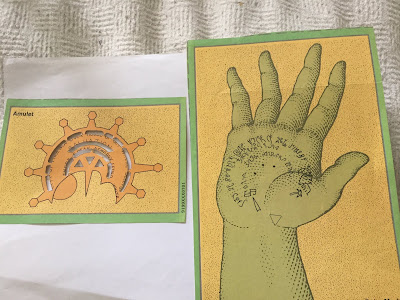

Unlike the locals, Destiny is able to decipher the High Melnibonean runes that are revealed in the form of a message:
City of Phoenix over the House of Set, where sleeps Salvation. There speak Atmophryeetno.
On hearing the translation, the locals are able to tell the party that there is a legendary city named Phoenix whose location is not far from the Oasis to the northwest. Apparently this city was buried when the Desolation came to the region 1,000 years ago. Its rough area is known, but nobody has ever found it, mostly because it is in a particularly parched part of the desert; perhaps the time has come...
There is some discussion about the strange final word. Destiny reckons it's a command term; presumably the idea is for them to go to this Phoenix place and find something that will help them in their quest for the final Star Gem of Martek. So off they go in their flying reed boats.
A few days later they arrive in the area roughly indicated by their friendly local tribesmen. There was a strange moment on the journey where something unfeasibly large could be seen swimming through the sands just underneath the surface, so it is probably just as well they were flying. In the distance, a white gleam appears, and as they get closer it turns out to be the top of a white dome sticking out from the sands. It must have been uncovered by a recent sandstorm - yet another coincidentally suspicious coincidence.
The characters are now in the middle of a bowl-shaped depression in the midst of rough ground and jagged hills; the heat is even less bearable than the part of the desert they have been travelling through to get here. No wonder nobody else has tried to find the place - or, if they have, they did not return to speak of it.
The four adventurers guide their boats down to land around 50 yards from the conical top of the building they have seen. As Bomilcar jumps out onto the sand, it starts to give way beneath his feet, quickly turning into a sinkhole that slides softly into the city below. He comes to a halt in a partially open area of a street below:


Marion - stabby stabby dagger specialist; Nihrain who currently carries the Runestaff
Destiny - Menastrai sorceress covertly raised on Melnibone
Bomilcar - Weeping Waste nomad from a chieftain's family
Campaign Narrative
The four characters have just returned to the Oasis of the White Palm after rescuing Princess Shadalah from the powerful Fire Lord Khalitharius. They accomplished this with some aplomb, hardly coming across anything until the final encounter with the giant Efreet, who fled rather than confront them due to an enchanted amulet the group was carrying. They didn't know this at the time, but the route they took through the Crypt of Bard Al-Mosak to find the princess allowed them to avoid several powerful undead under his command; at one point there were five wights waiting for them in the same room. Now back at the Oasis, they lay the amulet over the markings on the princess' palm:

The markings on the amulet and the princess' palm. These are part of the handouts that come with the module. Quite clever...

This is what they look like when you overlay the amulet onto the hand of the princess - I hope you can read it okay.
City of Phoenix over the House of Set, where sleeps Salvation. There speak Atmophryeetno.
On hearing the translation, the locals are able to tell the party that there is a legendary city named Phoenix whose location is not far from the Oasis to the northwest. Apparently this city was buried when the Desolation came to the region 1,000 years ago. Its rough area is known, but nobody has ever found it, mostly because it is in a particularly parched part of the desert; perhaps the time has come...
There is some discussion about the strange final word. Destiny reckons it's a command term; presumably the idea is for them to go to this Phoenix place and find something that will help them in their quest for the final Star Gem of Martek. So off they go in their flying reed boats.
A few days later they arrive in the area roughly indicated by their friendly local tribesmen. There was a strange moment on the journey where something unfeasibly large could be seen swimming through the sands just underneath the surface, so it is probably just as well they were flying. In the distance, a white gleam appears, and as they get closer it turns out to be the top of a white dome sticking out from the sands. It must have been uncovered by a recent sandstorm - yet another coincidentally suspicious coincidence.
The characters are now in the middle of a bowl-shaped depression in the midst of rough ground and jagged hills; the heat is even less bearable than the part of the desert they have been travelling through to get here. No wonder nobody else has tried to find the place - or, if they have, they did not return to speak of it.
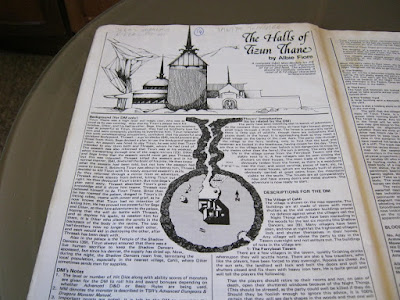
The four adventurers guide their boats down to land around 50 yards from the conical top of the building they have seen. As Bomilcar jumps out onto the sand, it starts to give way beneath his feet, quickly turning into a sinkhole that slides softly into the city below. He comes to a halt in a partially open area of a street below:

Map of the part of the city of Phoenix uncovered by the players. Bomilcar has arrived at the point marked 1A at the bottom (south) portion of the map. The idea is that the PCs make their way through the various sand-covered buildings to their goal at the top of the map, a statue of Set that is the clue mentioned in the secret writing. Of course, they don't know all of this yet...
Bomilcar shouts up to the others: "I'm okay! I seem to be in a street the sandfall has partially uncovered; there is an entrance to a house to my left." Marion replies, "Don't move, we're coming down to join you." The others have fun sliding down the sand ramp and meet their friend on the deserted streets of the buried city.
Dusting themselves off, they see that Bomilcar is correct. To their left is a rather elaborate portico entrance leading inwards; this house or whatever it is must have belonged to someone wealthy. They decide that this is their best chance at working through the city in search of the House of Set, whatever that means. They aren't too worried about the air supply; the sinkhole they created is letting plenty of light and air. Besides, if the sands above are this unstable, chances are there will be more sinkholes and airways. Of course, that also means some creatures or possibly even people might have fallen down here on previous occasions.
Staying alert, the four friends make their way into the house. They arrive in a formal sitting room (point 2 on the map) with a further arched entryway leading to their right, i.e. northwards. The sitting room is nicely appointed, with a lovely mural showing a beautiful city on the shores of a lake, surrounded by rugged hills - this is what Phoenix must have looked like in its heyday. The furniture is tasteful, lovely wooden tables and chairs inlaid with gold.
The archway takes them into a superb dining room, with an alcove exiting ahead of them to their right at the far end of the room. The fittings and cutlery are all of the finest quality, as is the dining service. They don't bother to loot any of this since they are well past the need for petty cash; instead, they move through the room to the alcove (point 5 on the map). Here they are presented with two exit options. Immediately to their left is a kitchen, with what looks like a long hallway beyond. Straight ahead of them is the street outside the house, with a sand collapse to their right and left as they look at it - presumably this is a continuation of the same road on which they landed. Off to their left on the other side of the street is a doorway into another building.
However, the little atrium in which they are now standing contains one other secret, the first sign of intrusion they have encountered since their arrival. A desiccated body lies on the floor, presumably someone who died from lack of food, water or air. The lifeless husk has effectively been mummified and preserved by the environment, but as the air of their passage swirls the dust around it, the body collapses completely into dust. There are no bones, which makes the party rather anxious. Better be on the look out for some neat, clean walking skeletons, the remnants of previous unfortunates to have been caught here.
The group decides to finish their investigation of the house they first entered before they cross the road outside. The kitchen is as well appointed as the rest of the place, but the hall beyond it presents something very strange (map room 7). A black obelisk stands at the far end of the room, and something is glinting from the wall directly behind it. There are also what looks suspiciously like several bodies on the floor there, in postures that look even more suspiciously as though they died from extreme violence. The players decide to give this a wide berth for now; they can always come back to investigate later if necessary.
Crossing the road takes them to the building marked 8 on the map. This place is magically darkened, so Destiny uses a Light Rune so that they can see well enough to make their way through what turns out to be a maze. Eventually they arrive at a large sigil set into the ground, an obvious teleportation disk. It's not as though they have any alternatives, so they step on it and are teleported into a maze of light. Of course, they don't know this, but it's a room adjacent to the previous one (number 9 on the map). Permanent light bounces off mirrored walls, floors and ceiling in a way that is designed to disorientate in the opposite way from the previous maze of darkness, but Destiny solves this easily enough by reversing her Rune of Light to darken the place. Eventually they make their way into a long, narrow exit corridor (area 9) with a single archway to their front.
They now find themselves in what used to be a library. Four more desiccated and very dead adventurers are lying on the floor, but they obviously trashed the place before they died. "Vandals!" thinks Destiny - there might have been items of valuable information in here (room 10). There appears to be no exit, but Bomilcar and Marion between them realise there is something odd about the wall to their left. It turns out that part if it is designed to collapse inwards as a trap, but presumably this will also provide a way out for the party. Marion uses her magical grappling hook to indent itself in the wall and then pull it down into the room from a safe distance.
The adventurers now find themselves in a very posh sitting room that looks out onto a massive ballroom to their right (room 13). They tentatively move into the ballroom and notice there is a further room on this side. They decide to check it out, not wanting to leave any unexplored areas behind them, even if all they do is a have a quick look. They will need to traverse the ballroom to what looks like several exits across from them. The final room on this side, however, seems very dangerous, as Bomilcar detects a trap door in the middle of the chamber. Deliberately setting it off, Marion reveals a pit that has been curiously dug out to the west, heading towards the room on the other side of the road that contained the black obelisk. A quick look reveals another pit trap at the far end, presumably activated from behind the obelisk. Lying on the floor of this rough-hewn corridor is another mummified body, this time of a man with a pickaxe. He obviously must have fallen through one of the two traps and ended up stuck; he obviously did his best to tunnel his way out, but died before he could manage it. Marion rejoins her friends.
The ballroom turns out to be a bit of a laugh, if you like that sort of thing. It is a properly sprung dance hall, and the characters all have to be careful as they make their way across the floor - effectively, they either dance or crawl their way out. They now find themselves in a long corridor with a single door to their front right (point 14 on the map).
This leads in turn to a very strange sight: the top of a spiral slide, kind of like the sort you'll find at a funfair, except this one is indoors. There are the remains of several mats for your bum, but Marion just gathers her cloak around her and slides down the thing, quickly followed by the others. They are deposited on another relatively open part of what is presumably the same main street as before. Directly opposite them is the frontage of a huge building, which turns out to have been a large bath house.
This, however, is where they finally meet their predecessors in person. A wraithlike figure appears from the drain at the bottom of one the large communal baths, and at the same time a dozen or so skeletons appear from the other side of the main central chamber. The players use their powerful weaponry to despatch the wraith first; they know how nasty incorporeal undead can be, and they also reckon that it is probably this creature that controls the skellies from the various bodies they have found dotted about the place. This is a correct supposition; destroying the wraith causes the skellies to crumble to dust. Destiny reckons it was probably originally a Chaos priest in life - something like that.
The far side of the baths just leads to more of the collapsed sand that has flooded the city, so the players decide to see what is in the drains from which the wraith emerged. A dry sewer tunnel leads northwards and then eastwards, where it joins up with another main tunnel. There is a manhole cover above, so they push their way back up through there onto ground level.
They now find themselves standing in front of a large statue of Set, which is holding another of those amphora-type bottles the people round here seem so fond of using. Destiny utters the command word Atmophryeetno and unstoppers the bottle; a powerful air elemental lord appears. He joyfully forms himself into a whirlwind and blasts through the sand covering the city. "Khalitharius!" he roars; "I'm coming to get you!"

Battlemap of the city portions the players traverse. You can just about make out the plaza with the statue of set at the very top left of the photo as you look at it.
That will keep the Fire Vizier busy while the players get on with the rest of their mission, and the city of Phoenix has finally emerged from its slumber of ages.
Umpire's comments
Some of the buried city is a bit silly in the original module, the idea being that it was a playground of the idle super-rich. Hence the funfair slide, the mazes and so on. The first house was supposed to be clownish, with little tricks, cream pies in the face and so on, but that's just daft. Removing that gave the whole place a sense of foreboding, which worked well in play - the skeletonless bodies was freaky. So was the black obelisk, which actually was a lure; the gleam behind it was from a Mirror of Opposition on the wall, and this was what was killing the few hardy adventurer types who made it this far. Well, that and the lack of food, water or even air. Any who died here ended up under the control of the wraith. As usual, though, the players' single-minded concentration on the mission at hand saw them through. I decided that the violent emergence of the Lord of the Air not only revealed the city but would have destroyed the mirror as well, but the players didn't know any of this. The thing moving under the sand while they were on their way to the city was, of course, a Dune-style sandworm.

That was fun! It's got a nice old school feel to this adventure and what's not to like about a Dune style sand worm!
ReplyDeleteBest Iain
Definitely old school. I know D&D is usually considered the epitome of old school, especially given its prominence in the noise about Old Scool Revival, but I just keep coming back to Stormbringer.
Delete